Pillowcase Dress Tutorial

Happy New Year! And with the new year, I've decided to take care of some unfinished business. I had promised a Pillowcase Dress tutorial, and here it is! I finally finished it and am really excited to share it with you. Hopefully you'll be inspired to sew one of your own, maybe even get some friends together and have a sewing party!


This pillowcase dress tutorial was originally designed for the Little Dresses for Africa event that was hosted by Emily from Mothers, Daughters. This is a very basic tutorial for the beginner sewer!

You only really need buy two things: a pillowcase, and two yards of double fold bias tape!

click HERE for a pdf of the tutorial. Thank you wordpress for supporting pdf uploads.


THE PILLOWCASE DRESS TUTORIAL

Materials:
1 pillowcase 
2 yards double bias tape 
All-purpose thread 
Fabric Scissors 
Straight pins


Steps:


1. On the pillowcase, there will be a sewn end, and an open, hemmed, end. Cut off 2.5” at the sewn end. Reserve the scrap.


2. Measure the length of the pillowcase and make note of the size you are making: Small = 16”-22”, Medium = 24”-28”, Large = 30” - 34”


3. Fold the pillowcase in half lengthwise, lining up the long edges. Pin the armhole template (using the correct size) to your pillowcase, lining up the “fold line” with the long edges of the pillowcase. Cut. Unfold to have armholes cut on both sides.

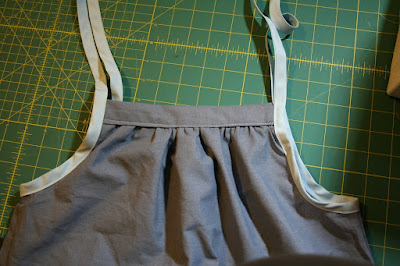
4. Choose one side to be your “front”. Set your stitch length to the longest setting and sew across the “front” top edge using a ½” seam allowance. Sew another row 1/8” below that. Do not backstitch at either end.


5. Grab the two bottom threads and gently pull to gather the fabric. Adjust to the length you need: 6” for small, 7” for medium, 8” for large.

6. Press the ruffles with the iron so it’s flat and easier to work with.

7. Cut the 2.5” scrap into two equal lengths.

8. Pin the scrap to the wrong side of the ruffle edge, raw edges lining up.

9. Reset your stitch length. Stitch the scrap to the dress using a 1/2” seam allowance. Back stitch at each end. Trim the excess scrap fabric.


10. Flip the scrap piece to the front of the dress. Pin, ensuring you are covering any stitching from the ruffles.

11. Edgestitch the scrap to the dress.

12. Repeat on the top “back” edge.
13. Cut two 1 yard pieces of double fold bias tape. Optional: open the tape, and turn the ends under ¼” on each end; press or pin closed.
14. Open the bias tape and mark the ½ yard point on the bias tape with a pin. Pin to the armpit fold of the dress. Wrap the bias tape around the raw edge of the armhole and repin to hold in place.


15. Continue encasing the bias tape over the raw edge of your armhole. Ensure you’ve pinned through all layers: both sides of the bias tape as well as the pillowcase.


16. Stitch the entire length of the bias tape closed.


17. Repeat on the other armhole using the remaining 1 yard of bias tape.

18. Your pillowcase dress is complete! Feel free to add any embellishment to the dress!

Read more...

Shirt and tie


This Christmas, my sister asked us specifically to avoid buying toys for her two sons. They were overflowing with toys (I stayed in their guest bedroom, which resembled much more of a Toys R Us warehouse than a bedroom.)

I stumbled upon this tie tee-shirt on omi creates and decided it was the perfect blend of "crafty" without overcommitting myself to a homemade Christmas present that may not ever get completed...


I bought some basic long sleeve (Ottawa in the winter is coooold!) t-shirts from Old Navy and machine appliquéd a tie directly on the front of two shirts: one for my 2-year old nephew, Max, and one for a my 6-month old nephew, Ryker.  I also decided to make some bow-tie shirts with a little pleat in the bow.

Without the monkey-suit-feel of a tux, Max was able to add a little pizazz to his outfit!

Read more...

Christmas Reindeer Pops

Just a quick post to wish everyone a Merry Christmas and to share about these fabulous reindeer pops that my friend Magda made. Aren't they adorable?


The head is made with an Oreo truffle, which is just a simple blend of Oreos and cream cheese.

Hope you all have a wonderful Christmas filled with love and chocolate!

Read more...

Fabric ornaments


December is always filled with mixed emotions of exciting holiday celebration and oh-my-goodness-I'm-too-busy!

I love the idea of making Christmas gifts. After I took the snap coin purse class, I had originally thought to make a few as gifts for friends. Unfortunately, the workroom ran out of purse frames... So I went on a hunt for another easy Christmas project.

Vanessa Christenson posted a great tutorial on her blog for fabric ornaments and I was sold. I picked four different print fabrics and decided to mix it up with some Kona solids.


The project is super easy. I got really good at sewing curves on the machine, and eventually got used to the hot glue gun and stopped burning myself...

Some lucky friends and family will be getting a fabric ornament for Christmas depending on how many I manage to make! I just dropped off my first batch at the workroom for the awesome pretty ladies that work there! In exchange, I stuffed my face with baked brie at this month's Stitch and Bitch. I think it was fair tradeoff!

There are less than two weeks left until Christmas and I've still got a couple projects to finish! Hope you're all having a great December, whether you're rushing to get some crafty projects done or braving the shopping malls!

Read more...

Pillowcase Dresses


Those of you who know me well, know of my intense love for jokes -- the terrible ones.

So here's a great one to kick-start this post:

"Corduroy Pillowcases Make Headlines!"

This past weekend was the Little Dresses for Africa event. Emily (and hubby) did a fantastic job of organizing the event, with close to 30 participants sewing dresses from pillowcases! Jenn and I were so glad to be helping out. We taught several newbie sewers the ins and outs of the basic sewing machine and then they each created a beautiful dress from a basic pillowcase!

It took a little while to get the hang of things, but a super-size thank-you to all the great ladies that came out! Your patience, enthusiasm and dedication were most appreciated!


The room was beautifully decorated with tissue paper pom poms and the cutest little "trim station" with multicoloured ribbons, thread, trim etc. The snack station was overflowing with delicious treats: cookies, rum cake, cream puffs, mini muffins.

Emily made the cutest little "button" shortbread cookies as thank you favours.


I'm going to clean up the tutorial that I developed for the class and make a link available on the site! You can sew your own pillowcase dress and send it to Little Dresses For Africa, and maybe even use the tutorial to sew a summery tank top for yourself ;)

Read more...

Little dresses for Africa

My dear friend, Emily, is hosting a wonderful event: Little Dresses for Africa.

It's a sewing event where you can learn some basic sewing techniques, sew a super cute little girl's dress using a pillowcase, bedazzle it to your liking, and then donate it to Africa. Did I mention there will be delicious baked goods?

Jenn and I will be teaching the sewing workshops! For more information, click on the image below. No sewing experience necessary!


Read more...

The chewiest cookies in the world


In my last post, I raved about Elizabeth Hartman from the blog Oh, Fransson!

This post gives a shout-out to Joy, from the food blog Joy the Baker. Joy's blog is full of great recipes accompanied by great photos of her food. She's got a great quirky personality that shines through in her posts, always really fun reading. Plus, she has freckles. Freckles are cool.

I've had Joy's Chewy Molasses Chocolate Chip Cookies recipe bookmarked for a while now. I'm not usually on the hunt for a cookie recipe, since my usual recipe is so tasty, and probably the healthiest you can get given that it's a chocolate chip cookie. But when my good friends Tammy and Trev were so kind as to lend us a whole whack of baby stuff, it called for an extra special cookie recipe. The healthy whole wheat ones just wouldn't cut it.

The best thing about this cookie recipe is that you don't have to remember to soften the butter to room temperature. It calls for melted butter. (You don't have to keep the pot on the stove until the entire cup of butter is melted. Once it's about 2/3 melted, turn the heat off and swirl the melted butter around until the last 1/3 melts.)

The next best thing about the recipe is that it uses molasses. And although I don't always have molasses in my house, buying a small carton for this recipe guarantees that I will make this recipe another 3 or 4 times. The molasses stays good in the cupboard for... well, for a very long time.


I've made a couple really tiny tweaks to Joy's recipe. I don't have bread flour in the house, so I used all-purpose flour. Use 2 1/4 cups of all purpose flour. Instead of 1 egg and 1 egg yolk, I just use two eggs. Why waste the egg white? I also find that 1 1/2 cups of chocolate chips is plenty. Finally, I skip the sea salt, but I bet that would be a tasty addition if you're not planning on bringing them to an office potluck where the sea salt will likely go unappreciated.

The result is a truly magical cookie. Like the kind you get from a gourmet cookie shop. Leave lots of room between the balls of cookie dough because it really spreads out to a thin, chewy cookie. I highly recommend the use of a small ice cream scoop (I have this one). If you don't own one (or two), add it to your Christmas list! It's a huge time-saver, not to mention an integral part of portion control...


Read more...

  © Blogger template Shush by Ourblogtemplates.com 2009

Back to TOP