Japanese Snap coin purse


For my birthday back in July, one of my most stylish friends, Mel, gave me a stash of beautiful Japanese fabrics. Last year, I made a bunch of zippered pouches for the craft sale at my church. Mel had mentioned that this fabric would make super cute change purses.

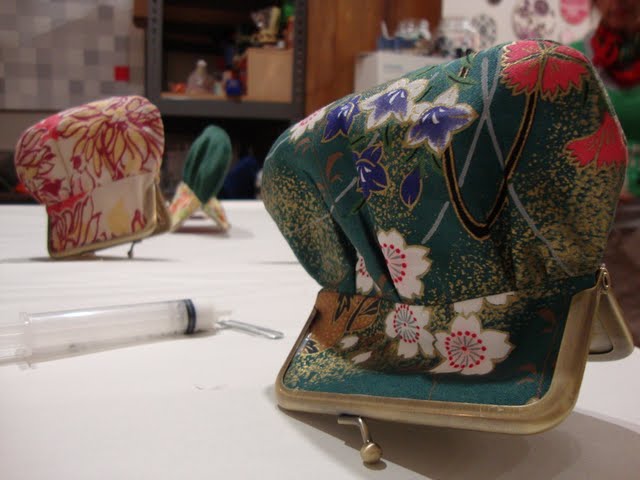
I decided it would be perfect to take the snap coin purse class at the workroom and learn how to make these change purses properly. I always do a better job when I take a class.  The pattern that Reva designed for the class has a pretty little ruche to give the purse a little body.


I chose the gorgeous teal Japanese fabric and fussy cut it so that there were cherry blossoms showing on both sides. For the lining, I used leftover fabric from my pleated marble dress. Now I just need to do what Karyn did a couple years ago and assembly-line the whole process to make a whole bunch as Christmas gifts! Or hope that there's another craft sale at my church again!


Read more...

Multi-tasker Tote for baby


My friend, Julie, showed me her fabulous Multi-tasker tote by Anna Maria Horner and noted how perfect it was as a baby bag.

My favourite bag to sew is usually the Birdie Sling by Amy Butler, but it's not a great pattern for a baby bag.

This Multi-tasker has nice big pockets on the outside (perfect for bottles?) and the opening to the bag is nice and wide. The biggest downside of the Birdie Sling is probably its small opening: I find myself digging around for stuff, unable to open the bag wide enough to find my smaller items.


I had just enough nani iro oil cloth left over from my rain jacket expansion to use as the exterior fabric. I added some bright yellow piping to make the pockets really stand out, and then added an extra zippered pocket to the inside of the bag. I also wanted the straps to be extra comfy so I widened it slightly and added a thick interfacing.


I'm so proud of this bag. There are so many options for customizing; I think the next time I make this I will also add an exterior pocket. If I ever get to set up shop teaching some sewing classes, this is definitely my first pick: it's loaded with easy basics as well as lots of room for creative additions!


Read more...

Clothing expansion

When women talk about expanding their wardrobe, we are usually talking about the exciting prospect of adding the latest and greatest new fashions to our closet.


I am expanding my clothes. But not as described above. Dustin and I are expecting a baby girl in February (yay!) and I am literally expanding my clothes. I've altered several pants already (super easy with all the tutorials out there) and after a crazy drop in temperature in mid September, I set out to alter my fall rain jacket.

Last Christmas, my brothers cleaned out my wishlist from the workroom. One of the items was a meter of nani iro oilcloth. I'm so glad I asked them for it. The workroom no longer has it in stock, and I had it all saved up for a perfect project like this. (I recently used the rest of it on a beautiful Anna Maria bag, but that's another post!)

I cut out a section much wider than I needed and then sewed pleats into it to allow for additional expansion (especially in the midsection.) I lined it with some leftover fabric from my paisley sampler quilt and then finished the neckline with some fuzzy hounds-tooth fabric: gotta have something fuzzy by your chin.

To get a compatible zipper, I went to the Leather and Sewing Supply Depot on Queen West (amazing store for zippers) and asked the lady to find the perfect match.

The best part about this alteration is that I can undo the expansion and eventually use the jacket in its original size again (Oh how I long to be a size small again...)

The downside? The jacket hides the baby bump quite well, and I have noticed a significant reduction in seat-offerings on the subway...


Read more...

Laptop cozy

I've had the wonderful pleasure of enjoying the life with a macbook pro for a little over a year. I've now graciously donated it to Dustin, as we decided he would make better use of it in his last year of his phd studies and especially now that he's teaching a lecture at the University of Toronto. I'm nice that way.

The laptop now sees much more of the world; Dustin brings it everywhere with him. It made sense that I make it a nice laptop travelling case.


I used Elizabeth Hartman's tutorial. Her tutorials are always among my favourites. I have her quilting book and love reading her blog "Oh, Fransson!"

It's tough for me to use fabrics that aren't super girly, vibrant, or whimsical. But I couldn't have Dustin's students laughing at his laptop cozy. I dug out some cute dog-bone fabric and fuzzy red and black hound's tooth fabric. Masculine-cute.


I finished it off with a little personalized stitch.


Read more...

Harvesting basil seeds


As the chilly weather consumes Toronto, our balcony garden is coming to an end. The green tomatoes seem to have given up their quest to reach redness. The little cucumbers and zucchinis have settled as miniatures. But oh, the basil plants are now perfect for harvesting seeds.

We stopped pinching off the basil flowers back in August. The flowers eventually grew to be spiky stalks with pods of seeds.


It's so satisfying to be able to harvest your own seeds! And now that it's getting chilly out, we're hoping to have some indoor basil plants.


It's really amazing how many seeds you get from one tiny pod. And then how many pods are on a stalk. And then how many stalks sprout from one basil plant. We're going to have enough basil seeds for eternity. Or, we share!

If you'd like some basil seeds to plant indoors this season (or to hang onto for spring) leave me a comment sharing how you like to use basil! I'll mail out 3 pouches of basil seeds! Happy Thanksgiving!

Read more...

Basic beets


It's really quite amazing to remember my struggling beet days. When Dustin and I first signed up for the CSA box a couple years ago, we were thrust into a world of root vegetables: oftentimes, beets.

I am now a full blown beet fan. It's a regular favourite of mine to order at a restaurant. (The salted baked beets at Bannock are fantastic.)

This year, two beet plants survived in our garden. The seeds are cute little clusters. Somehow I thought each cluster would yield a few beets... No, one seed cluster equals one beet. Hence, two beets from our garden this year.


At home, I keep it simple: boiled and seasoned. It always turns out great and leaves so many options for adding extra flavours.

I start by boiling the washed, unpeeled beets. Depending on the size, it takes 30 or 40 minutes. When fork tender, drain and peel when they are cool enough to handle. Dice/chop to desired size.


While the beets are still warm, add a generous splash of seasoned rice vinegar (also known as sushi rice vinegar). I like to use Marukan brand.

Serve chilled or at room temperature.


That's it! This basic recipe is how I usually eat my beets at home. I've added tarragon, thyme, cashews, and even sour cream.  I bet some horseradish would be delicious.

For all those beet skeptics, I really think this is the way to eat beets.  The tang in the vinegar really balances the earthy beet flavour.  If you don't have seasoned rice vinegar, use apple cider vinegar. It's equally tasty and would pair well with some diced apples!

Read more...

  © Blogger template Shush by Ourblogtemplates.com 2009

Back to TOP