Happy New Year!
And with the new year, I've decided to take care of some unfinished business.
I had promised a Pillowcase Dress tutorial, and here it is! I finally finished it and am really excited to share it with you. Hopefully you'll be inspired to sew one of your own, maybe even get some friends together and have a sewing party!

This pillowcase dress tutorial was originally designed for the
Little Dresses for Africa event that was hosted by Emily from
Mothers, Daughters. This is a very basic tutorial for the beginner sewer!
You only really need buy two things: a pillowcase, and two yards of double fold bias tape!
click HERE for a pdf of the tutorial. Thank you
wordpress for supporting pdf uploads.
THE PILLOWCASE DRESS TUTORIAL
Materials:
1 pillowcase
2 yards double bias tape
All-purpose thread
Fabric Scissors
Straight pins
Steps:
1. On the pillowcase, there will be a sewn end, and an open, hemmed, end. Cut off 2.5” at the sewn end. Reserve the scrap.
 2. Measure the length of the pillowcase and make note of the size you are making:
Small = 16”-22”, Medium = 24”-28”, Large = 30” - 34”
2. Measure the length of the pillowcase and make note of the size you are making:
Small = 16”-22”, Medium = 24”-28”, Large = 30” - 34”
 3. Fold the pillowcase in half lengthwise, lining up the long edges. Pin the armhole template (using the correct size) to your pillowcase, lining up the “fold line” with the long edges of the pillowcase. Cut. Unfold to have armholes cut on both sides.
 4. Choose one side to be your “front”. Set your stitch length to the longest setting and sew across the “front” top edge using a ½” seam allowance. Sew another row 1/8” below that. Do not backstitch at either end.
 5. Grab the two bottom threads and gently pull to gather the fabric. Adjust to the length you need: 6” for small, 7” for medium, 8” for large.
 6. Press the ruffles with the iron so it’s flat and easier to work with.
 7. Cut the 2.5” scrap into two equal lengths.
 8. Pin the scrap to the wrong side of the ruffle edge, raw edges lining up.
 9. Reset your stitch length. Stitch the scrap to the dress using a 1/2” seam allowance. Back stitch at each end. Trim the excess scrap fabric.
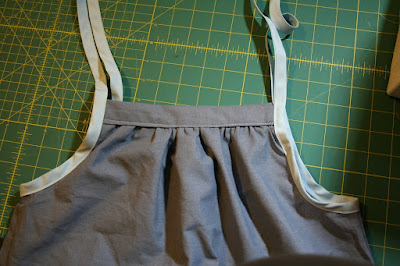
 10. Flip the scrap piece to the front of the dress. Pin, ensuring you are covering any stitching from the ruffles.
 11. Edgestitch the scrap to the dress.
 12. Repeat on the top “back” edge.
13. Cut two 1 yard pieces of double fold bias tape. Optional: open the tape, and turn the ends under ¼” on each end; press or pin closed.
14. Open the bias tape and mark the ½ yard point on the bias tape with a pin. Pin to the armpit fold of the dress. Wrap the bias tape around the raw edge of the armhole and repin to hold in place.
12. Repeat on the top “back” edge.
13. Cut two 1 yard pieces of double fold bias tape. Optional: open the tape, and turn the ends under ¼” on each end; press or pin closed.
14. Open the bias tape and mark the ½ yard point on the bias tape with a pin. Pin to the armpit fold of the dress. Wrap the bias tape around the raw edge of the armhole and repin to hold in place.
 15. Continue encasing the bias tape over the raw edge of your armhole. Ensure you’ve pinned through all layers: both sides of the bias tape as well as the pillowcase.

 16. Stitch the entire length of the bias tape closed.
 17. Repeat on the other armhole using the remaining 1 yard of bias tape.
 18. Your pillowcase dress is complete! Feel free to add any embellishment to the dress!


This is so awesome!!! I need to make one...I just have to get to Fabricland first to stock up on sewing supplies....can't seem to find the time!
nice manicured display hands! ;)
Great tut, Kel. Seriously looks like it was a lot of work! Huge props. You're going to make us, as teachers, obsolete :)