Showing posts with label sewing. Show all posts

Envelope t-shirts

At first glance, this blog implies that I have been quite successful in keeping up with my crafty and foody hobbies. But if you look closely at the dates of the posts, and look even closer at the dates of the pictures from the posts, you will see that I binge-sew and binge-cook.

The cycle usually begins with a mild depression. Pregnancy and then early motherhood (and then regular being-a-girl) has been a rollercoaster ride of crazy emotions for me. I always tell people (and by "people", I mean Dustin) that what makes me crazy is also what makes me awesome. Boringly sane people are rarely awesome.

My mild depression usually ends in sobs of how I miss doing things for myself. So I cry it out, decide to make time for me, binge out on me-time, and then feel ready to rock it out with Lily again. Until the next depression hits, then we rinse and repeat.

But during the me-time, I get lots of great blog-worthy stuff done, and most importantly, I catch up on many of the things I've been wanting to do.

My dear friend Emily has taken wonderfully to motherhood and she has also been able to keep up with so many of her passions. Her blog leaves me in awe.  She always remembers my birthday, and even shopped for Lily this Christmas. I was determined to return the thoughtfulness by sewing something nice for her darling baby Lucas.

I've had my eye on Dana's 90 minute shirt tutorial for a while now. I find the envelope-style neckline makes it so much easier to get over big baby heads. In early January, I made my first attempt and used one of Dustin's old orange tshirts. I think I got lucky and the tshirt was almost perfect.


I just needed a couple changes to neckline, a little more room in the torso, and I was ready to make one for Lucas!

Wrong. Attempt #2 left me with a neck that was too big, armholes that didn't match up, and an express ticket back to devoting my time to Lily and muttering mean words to my sewing machine.

I slowly worked on a 3rd revision, which quickly led to a 4th. I finally went back to Dana's tutorial and restarted a new pattern from scratch.

The final pattern is definitely for a bigger baby; I'd guess it's in the 12-18 month range, but at least it wasn't too small. And I'm not ready to make a smaller size yet. Lucas will just have to cuff up his sleeves for a while.

I finished off Lucas' tshirt with an 'L' and then continued on my streak and sewed another one for Lily.


Usually when making gifts for friends, I wait until I give them the gift before blogging about it. I thought it would be neat doing it the other way around this time. I had already told Emily of my plan to sew Lucas the shirt and that I was have "trouble". So it's no surprise a tshirt is on its way. Now we can look forward to our next playdate where we may force the kids to wear their shirts so we can take pictures and be "those" moms. Maybe we can get them to hold hands...

Read more...
Baby mittens


Autumn is my absolute favourite season. This year in particular because I get to enjoy it with Lily. I think it's safe to say that Lily is in love with the outdoors. She craves the fresh air, the buzz of traffic, the kids running around the park. We would go on 2, 3, 4 walks a day sometimes -- even during this past sauna of a summer. Thank goodness for the crisp weather change.

Along with this cooler weather is a need for some warmer gear. I haven't been able to sew much for Lily; mostly because there hasn't been the need since we got so many great hand-me-downs from friends and family. But with our numerous walks a day, rain or shine, Lily was in need of some mittens. Her cute little fingers were icicles by the end of our walks.


I pulled out some flannel from my stash, grabbed some ribbing material that never turned into a cardigan for myself, and after two attempts (with some guidance from this tutorial), Lily hands now stay warm in a cute little pair of infant mittens! I made sure to make the ribbed cuff extra long so they stay on better.

Raise your hand if you love them.


Read more...

Oh bring back my bonnet to me

I lost it. The brand new bonnet that I sewed for Lily. Yes, the one I just posted about.

In a chaotic kerfuffle at the park, the bonnet was misplaced. We returned to the park a couple hours later, scoured the area, even checked if it was not atop another cute child's head, but alas, we have declared it officially gone.

I don't know if I was more heartbroken or more relieved that I had made the bonnet. All that hard work, gone, but at least I can sew her another.

To mourn the loss of the truck-bonnet, I did a one-eighty and sewed her new bonnet out of the leftover elephant fabric from her houndstooth quilt. A pink bonnet with lace ties. Sorry Dustin, pretty much as girly as it gets.

Lily was nice enough to model the new bonnet on my birthday picnic!


Read more...

Baby Sunbonnet: Success!


After a little encouragement from the peanut gallery, I have successfully sewn Lily a sunhat that is functional and fashionable!

My first attempt at a baby sunhat back in March was embarrassing. I had decided to create my own design with little to no research or hat-sewing-experience; after all, how hard could a hat be? I was very wrong. Not only did it not fit, but I realized it was not well designed. Children's hats need a tie so they can't swat the hat off. I also realized that Lily would benefit more from a bonnet rather than a sunhat whose brim went all around the head. With a full brim, she had trouble lying back in her stroller or carseat.

By June, I still had not sewn Lily a new hat. With this unending sunny weather, I desperately needed to purchase one to tide us over. I found a really great bonnet at Diaper-eez in Bloor West Village and it fit Lily for a full 2 weeks before it was barely shielding the sun from her eyes. Here was my chance to redeem myself (and finally be worthy of Jenn's praise) and make her a bonnet that was the right size -- and with room to grow so it would last into the autumn.

I took some pointers from the bonnet we had bought and reworked it a bit. A bonnet is essentially three pieces: the back of the head, the brim of the hat, and the piece in the middle that joins the two.

With some basic pattern drafting skills that I picked up from (none other than) the workroom, I created a cute little sun bonnet with a nice large brim for Lily. I chose a lightweight cotton with blue trucks, a boyish touch to an otherwise girly hat!


Read more...

Wedding wheel quilt

I just don't know how they do it. "They" meaning all those blogging mothers out there. They are super-moms. I love reading Made (www.danamadeit.com) where there are such great sewing ideas and inspirations by mother-of-three, Dana. And oddly enough, Dana's most recent addition to the family, Clara, was born on the same day as Lily! And it hasn't slowed her down one bit! Definitely a super-mom.

Maybe my blog has suffered a little, but I'm still so impressed by the little bit of sewing, crafting, and baking I get done these days. A different level of super-mom, but super nonetheless.


My most recent project was a quilt for my brother and my new sister-in-law (congrats Karl and Joelle!). I had been following the 100 days of Modern Quilting hosted by themodernquiltguild.com/ and came across a fabulous "Ring Quilt" by Isobel Piper. It was the perfect design for a wedding quilt that was a billion times easier than the double wedding ring quilt I made my parents, but still had the "infinite circle" motif to represent their eternal marriage.

The wedding colours were teal, silver, and lime green, with an emphasis on the teal. It was great fun going through my fabric scraps to pull out colours for the wheel segments of the quilt. I used a Kona solid in "natural" as the background and then echoed the colour wheel with an ornate circle fabric from the Karavan collection by Valori Wells (the same collection as the pink elephants from Lily's houndstooth quilt) for the back of the quilt.

The pattern originally comes from the book Last Minute Patchwork and Quilted Gifts which I borrowed from the library. I remembered to trace the wheel segment template but neglected to copy anything else, so there was a lot of guess-work that went into this quilt. I had to do lots of trimming so that everything fit together in the end and created a circle rather than an oval.


I loved how Isobel Piper used concentric circles for her quilt, so I decided to do the same, although I used an entirely different technique. She took the time to draw the circles on the quilt -- I am far too lazy for that. Instead, I taped a quilting pin (since it is longer than the average pin) to my walking foot and using the head of the pin as a guide so my circles were the same distance apart. Genius, I know.


The quilting got progressively more difficult as I got closer to the center, so for the very middle of the quilt, I personalized a K and J with the wedding date.


My brother's wedding was simply gorgeous. Everyone (except maybe Lily...) had a wonderful time: an incredible venue (with a fantastic view of the Ottawa canal and the Parliament building), delicious food, breathtaking flower arrangements, and of course, a room full of wonderful friends and family.
[Photo by Kevin Fong]
[Photo by Elizabeth Pagnotta]


It was my absolute pleasure to spend Lily's nap times quilting this wedding wheel quilt for my brother and sister-in-law. May they continue to cuddle for afternoon naps until they are old and grey.


Read more...

Baby sunhat attempt number 1

I was chatting with my friend Jenn and told her about the sunhat I was making for Lily. She was amazed. I was flattered. My sewing time is limited and I was determined to be a good parent and shield Lily's sensitive skin from the harsh rays of the sun.


Precious hours later, I tested out the almost-complete hat on Lily.

Too small. I panicked. Far too small. No! Precious hours wasted!

While watching some fabulous figure skating this afternoon (yay Scott and Tessa!*) I practiced the art of seam ripping and at least salvaged the ruffled brim of the sunhat. I am determined to make this work (and earn Jenn's praise)!!! I'll let you know if/when I figure this out...


* My apologies for the spoiler, but honestly, none of you watch figure skating. I know it. I bet you want to tell me all about how your grandparents love it, though.

Read more...

Post pregnancy Marilyn Monroe dress

They call it the 4th trimester: the first three months after giving birth. I'm not sure why I didn't think it through, but for some reason I thought that after the baby was out, my belly would disappear. I had brought my favourite comfy clothes to the hospital only to find out that it was still incredibly tight at the waist as it takes several days for the uterus to shrink and for the belly to disappear. Silly me.

For the first month after Lily was born, I was still wearing my maternity pants, maternity jackets, and cardigans that didn't need to be buttoned up. Slowly, I was able to start zipping up my sweatshirts and wearing my old sweatpants. Slowly, I pulled out my old jackets for this springy weather. Slowly, I started to shed the baby weight.

Although this gradual reunion with my old wardrobe was exciting, I was not confident that I would be able to fit into a dress in time for my cousin's wedding. (Congrats Tiff and John!!!) The wedding was this past weekend, a little over a month after Lily's birth.


I took advantage of Lily's more sleepy days in the first couple weeks (and the extra adrenaline I had pumping through me) and sewed a dress from the book Famous Frocks that my (soon-to-be) sister in law bought me for Christmas. The book is a collection of iconic silhouettes from famous 20th century stars. From Audrey Hepburn to Twiggy. Jackie Kennedy to Madonna.

I decided to make the famous Marilyn Monroe dress, but with criss-cross straps rather than an open back.

The pattern was simple, and I was able to easily tailor to my odd post-pregnancy shape (medium chest, large waist, still no hips or butt...) I also had the perfect fabric in my fabric stash: a shimmery stretch jersey in a rich merlot-wine colour.


I worked on the dress for maybe an hour every day for two weeks: whenever Lily was down for a nap and I just didn't have it in me to nap while she napped. After about two weeks, Lily decided her crib was not nearly as comfy as napping in our arms so the sewing came to an abrupt stop. I had finished everything except the hem, and the straps on the back. Since I had used a jersey fabric (which doesn't fray) I just left the hem as-is and pinned the straps on with safety pins!

The dress turned out great. It ended up being just a bit loose; I probably lost a bit of weight in my chest/back since my initial fitting, but I just pinned the straps a little tighter. (Photo cred to my cousin Kev.)


Lily also had her own custom made dress. No, I'm not crazy and didn't also try to sew Lily a dress at the same time. My friend Danielle, from beadmarket.ca, sewed Lily a dress intended for this summer, but it was just too cute that I wanted her to wear it for the wedding. I sewed a quick belt to tighten the dress a bit and added some red tights to complete her look. Unfortunately (or fortunately) she was asleep in her carseat for most of the wedding and didn't get to show off the dress until the end of the night. I didn't get a great picture of her wearing the dress, but you can still tell she was cuuuute in that outfit!


Read more...

The 20-minute bib tutorial

Here's an easy peasy tutorial to make a small baby bib that takes no more than 20 minutes! This really is a perfect crafty baby gift.

Enjoy!

For the pdf version, click here (thanks wordpress!).


The 20-minute Bib
Tutorial by Kelly Dunwell
done-well.blogspot.com
 For home-use only

Materials:

Front fabric (at least 9” x 12”)
Back fabric (at least 9” x 12”)
Batting (at least 9” x 12”) - optional
1 set of snaps or Velcro
Fabric Scissors
Straight Pins
Matching thread
Bib template

Instructions:
1. Cut out the two pieces of the bib template and tape together at dotted line.


2. Using the template, pin and cut 1 pattern piece of the front fabric, 1 of the back fabric and 1 of the batting (if using). To save time, you can cut all three at once if you are careful to pin and cut through all three layers.


3. Place the front and back pieces good sides together; it doesn’t matter which is on top.


4. If using a middle batting layer, place the batting piece on top of the wrong side of either the front or back piece.


5. Pin around all sides but leave a 3” gap at the very bottom. I like to mark it off with pins so I don’t forget to leave the gap when I’m sewing. 


6. Starting just to the left of the gap, sew all around the bib using a ¼” seam allowance.  To help pivot around the curves, leave the needle in the down position, pick up the presser foot and pivot the fabric. You can do that several times to get a nice curve. Backstitch at each end.


7. Trim along the tight curves of the bib straps. Cut notches in the neckline. Be careful not to cut through your stitching.


8. Working from the strap ends first, flip the bib inside out.  At the gap, carefully fold the fabric inwards and pin shut. (Unlike my picture, you should point the pin to the right side to make it easier to unpin when sewing.)


9. Press all edges with the iron. Edgestitch around the entire bib, including the gap that you pinned shut.  Backstitch at each end.


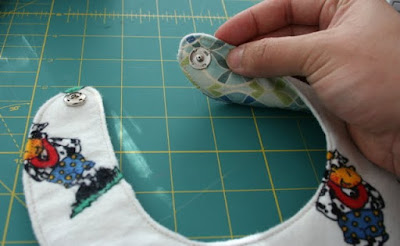
10. Attach your favourite snaps or Velcro of choice to the bib straps. I used sew-on snaps. Make sure you attach one half of the snap or Velcro to the front side of the bib, and the other on the back side of the bib.
You’re done! This basic, reversible bib takes only 20 minutes to sew, and you can modify to make it fancier if you want! 


To make a patchwork bib, sew together smaller scraps of fabric until you have a piece that is 9” x 12”. Give it a nice press with the iron. Continue with the above instructions.

To add piping or a lace fringe, sandwich the trim between the front and back fabrics in step 3 and pin with the raw edges lined up (fringe side facing the inside of the bib).  Make sure to place the pins perpendicular to the fabric so you can still place the batting layer on top without covering the pins.

Read more...

Patchwork bibs and baby shoes


I wish I had time to make handmade baby gifts for all my friends that are expecting new babies. Ideally, I would work on a beautiful elaborate quilt (like the Sunbonnet Sue quilt that I made for baby Stella) to match such a monumental addition to the family.

Almost as cool as a personalized quilt, I found this super cute pattern for baby shoes. I know, newborns rarely need to wear shoes, but ithinksew.com has such amazing baby shoe patterns: like this bootie, or these mary janes.  I decided to go simple and do a basic "sneaker" for Magda's baby. A gender neutral green with a padded olive green sole.


The shoes were relatively easy to sew. The last "flip inside out" was a little difficult, mostly because the shoes were so small! The next time I make them I will probably pick a fabric that has a bit of stretch to it for the sole. It will make it much easier to flip inside out.

To match the shoes, I sewed some baby bibs. I scoured the internet for a simple baby bib pattern, and didn't really find one that I liked. There are lots of fancy bib patterns (like the pattern Jenn used for the super adorable baby aprons she made me). But I wanted uber simple. So I just made it up myself. I'm actually going to post a tutorial on how to make the 20-minute bib. Stay tuned on that. Anyone can make one. Uber simple.


The bibs I made were pieced together with various green, brown, and blue fabrics. I don't have a lot of gender neutral fabrics, so patchwork-style worked perfectly to use up some of my smaller scraps. The other side of the bib is a soft flannel.

Lastly, I made a basic rectangular burping cloth. Two pieces of grey flannel with an organic cotton batting in between. I bound it with one of the bib fabrics and then did a little bit of machine quilting to keep the cotton from bunching up when washed.


I love how the three parts came together to make a nice "gift set".  I have a few more friends that are expecting babies soon, so hopefully I can whip up a few more of these simple hand-crafted baby gifts!

Read more...

Hats off to Lily!

Lily Marilla Dunwell was born on February 9th at 3:30pm weighing 6 lb 13 oz!


Her name is a nod to heroic characters in J. K. Rowling and L. M. Montgomery's famous stories of wizardry and imagination.

Lily was actually born a few days before her due date (in true Kelly-style: "arriving early with lots of time to compensate for unplanned events") and I have several partial blog posts that are ready to be finished up and shared with you!

I had made a conservative sewing "to-do" list for the expected arrival of Lily, and I managed to finish every single one of them (including her recently completed houndstooth quilt.)  I didn't plan to make any clothing for Lily, as our generous friends and family have showered her with plenty of this season's latest and greatest fashions. I did, however, notice that all the hats we received were quite large, including the one that we registered for (What was I thinking? 6-9 months baby hat? For the summer months??).


I found a blog post on Made by Rae where Rae makes a newborn hat out of an old T-shirt. She used a template from Martha Stewart and modified it slightly. I also modified slightly (the tutorial on Martha Stewart's site is dismal) and made the hat out of flannel.

I scaled the pattern so the length of the hat from front to back was about 7 inches and I used two different fabrics for the outside and inside so that it was reversible.  It turned out so great and took such little time that I whipped up another one for my friend Magda.  I thought about doing a step-by-step tutorial for this hat, so if anyone is interested, please leave a comment and I'll see what I can do!

Magda's baby isn't due for another few weeks but hopefully we'll get the babies modelling both hats at some point!

Read more...

  © Blogger template Shush by Ourblogtemplates.com 2009

Back to TOP