The 20-minute bib tutorial

Here's an easy peasy tutorial to make a small baby bib that takes no more than 20 minutes! This really is a perfect crafty baby gift.

Enjoy!

For the pdf version, click here (thanks wordpress!).


The 20-minute Bib
Tutorial by Kelly Dunwell
done-well.blogspot.com
 For home-use only

Materials:

Front fabric (at least 9” x 12”)
Back fabric (at least 9” x 12”)
Batting (at least 9” x 12”) - optional
1 set of snaps or Velcro
Fabric Scissors
Straight Pins
Matching thread
Bib template

Instructions:
1. Cut out the two pieces of the bib template and tape together at dotted line.


2. Using the template, pin and cut 1 pattern piece of the front fabric, 1 of the back fabric and 1 of the batting (if using). To save time, you can cut all three at once if you are careful to pin and cut through all three layers.


3. Place the front and back pieces good sides together; it doesn’t matter which is on top.


4. If using a middle batting layer, place the batting piece on top of the wrong side of either the front or back piece.


5. Pin around all sides but leave a 3” gap at the very bottom. I like to mark it off with pins so I don’t forget to leave the gap when I’m sewing. 


6. Starting just to the left of the gap, sew all around the bib using a ¼” seam allowance.  To help pivot around the curves, leave the needle in the down position, pick up the presser foot and pivot the fabric. You can do that several times to get a nice curve. Backstitch at each end.


7. Trim along the tight curves of the bib straps. Cut notches in the neckline. Be careful not to cut through your stitching.


8. Working from the strap ends first, flip the bib inside out.  At the gap, carefully fold the fabric inwards and pin shut. (Unlike my picture, you should point the pin to the right side to make it easier to unpin when sewing.)


9. Press all edges with the iron. Edgestitch around the entire bib, including the gap that you pinned shut.  Backstitch at each end.


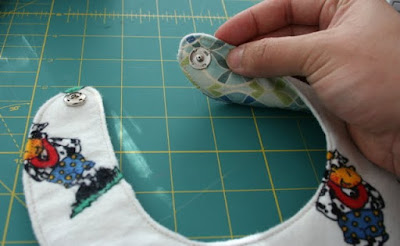
10. Attach your favourite snaps or Velcro of choice to the bib straps. I used sew-on snaps. Make sure you attach one half of the snap or Velcro to the front side of the bib, and the other on the back side of the bib.
You’re done! This basic, reversible bib takes only 20 minutes to sew, and you can modify to make it fancier if you want! 


To make a patchwork bib, sew together smaller scraps of fabric until you have a piece that is 9” x 12”. Give it a nice press with the iron. Continue with the above instructions.

To add piping or a lace fringe, sandwich the trim between the front and back fabrics in step 3 and pin with the raw edges lined up (fringe side facing the inside of the bib).  Make sure to place the pins perpendicular to the fabric so you can still place the batting layer on top without covering the pins.

Read more...

Patchwork bibs and baby shoes


I wish I had time to make handmade baby gifts for all my friends that are expecting new babies. Ideally, I would work on a beautiful elaborate quilt (like the Sunbonnet Sue quilt that I made for baby Stella) to match such a monumental addition to the family.

Almost as cool as a personalized quilt, I found this super cute pattern for baby shoes. I know, newborns rarely need to wear shoes, but ithinksew.com has such amazing baby shoe patterns: like this bootie, or these mary janes.  I decided to go simple and do a basic "sneaker" for Magda's baby. A gender neutral green with a padded olive green sole.


The shoes were relatively easy to sew. The last "flip inside out" was a little difficult, mostly because the shoes were so small! The next time I make them I will probably pick a fabric that has a bit of stretch to it for the sole. It will make it much easier to flip inside out.

To match the shoes, I sewed some baby bibs. I scoured the internet for a simple baby bib pattern, and didn't really find one that I liked. There are lots of fancy bib patterns (like the pattern Jenn used for the super adorable baby aprons she made me). But I wanted uber simple. So I just made it up myself. I'm actually going to post a tutorial on how to make the 20-minute bib. Stay tuned on that. Anyone can make one. Uber simple.


The bibs I made were pieced together with various green, brown, and blue fabrics. I don't have a lot of gender neutral fabrics, so patchwork-style worked perfectly to use up some of my smaller scraps. The other side of the bib is a soft flannel.

Lastly, I made a basic rectangular burping cloth. Two pieces of grey flannel with an organic cotton batting in between. I bound it with one of the bib fabrics and then did a little bit of machine quilting to keep the cotton from bunching up when washed.


I love how the three parts came together to make a nice "gift set".  I have a few more friends that are expecting babies soon, so hopefully I can whip up a few more of these simple hand-crafted baby gifts!

Read more...

Hats off to Lily!

Lily Marilla Dunwell was born on February 9th at 3:30pm weighing 6 lb 13 oz!


Her name is a nod to heroic characters in J. K. Rowling and L. M. Montgomery's famous stories of wizardry and imagination.

Lily was actually born a few days before her due date (in true Kelly-style: "arriving early with lots of time to compensate for unplanned events") and I have several partial blog posts that are ready to be finished up and shared with you!

I had made a conservative sewing "to-do" list for the expected arrival of Lily, and I managed to finish every single one of them (including her recently completed houndstooth quilt.)  I didn't plan to make any clothing for Lily, as our generous friends and family have showered her with plenty of this season's latest and greatest fashions. I did, however, notice that all the hats we received were quite large, including the one that we registered for (What was I thinking? 6-9 months baby hat? For the summer months??).


I found a blog post on Made by Rae where Rae makes a newborn hat out of an old T-shirt. She used a template from Martha Stewart and modified it slightly. I also modified slightly (the tutorial on Martha Stewart's site is dismal) and made the hat out of flannel.

I scaled the pattern so the length of the hat from front to back was about 7 inches and I used two different fabrics for the outside and inside so that it was reversible.  It turned out so great and took such little time that I whipped up another one for my friend Magda.  I thought about doing a step-by-step tutorial for this hat, so if anyone is interested, please leave a comment and I'll see what I can do!

Magda's baby isn't due for another few weeks but hopefully we'll get the babies modelling both hats at some point!

Read more...

Houndstooth baby quilt

Vanessa Chistenson has a wonderful blog filled with tutorials and patterns (like the fabric ornaments I made in December). When I saw her houndstooth quilt pattern, I was in love. I had promised Dustin not too much pink for baby's room, so I thought a chic dark-brown and beige houndstooth quilt would be perfect: a simple design to complement the "houses!" baby comforter.


This is the first quilt that I've made that has required only two fabrics. I could have easily picked two Kona Solids and called it a day, but what's the fun in that? For the dark brown, I chose a Kona Solid in espresso, but for the beige, I chose a mostly cream fabric with tiny little stars (Scandinavian Christmas collection by Lynette Anderson). The stars are subtle, but if you look closely, they're there! There was a lot of repetitive cutting and piecing. It's sometimes refreshing to be on autopilot and just go, go, go: I never had to stop and decide what fabric to use next.


When it came time to pick a fabric for the backing, the workroom had just received the Karavan collection by Valori Wells, including the beautiful elephant fabric Marrakech in Blossom pink. The print is quite large and worked incredibly well as the quilt backing. I also decided to do some more free-motion machine quilting since it went quite well on The Hunger Games quilt. I did a meandering pattern in cream thread (beginner's tip: always match your bobbin thread to your top thread in case your tension isn't the same!)


I really love how this quilt turned out. It will be perfect for play time on the floor, learning to roll over, tummy time, something to throw up on... Lots of memories await!


Read more...

  © Blogger template Shush by Ourblogtemplates.com 2009

Back to TOP